 Yes, cereal is a very easy go-to meal to serve on mornings when the kids are fighting, the dog’s barking and you’re running late. That’s pretty much every morning in my house. But there is not one box of cereal to be found. There is a reason for that: cereal makes you fat. Most breakfast cereals are very high on the glycemic index. The glycemic index, or GI is a measure of the effects of carbohydrates on blood sugar levels. For most people, sending an overwhelming surge of sugar into your system is the prescription for building excess body fat and sets you up for a major crash later. It takes 2 minutes to microwave an egg and turkey sausage. Add some fresh fruit and breakfast is served. Or I guess you could serve up any one of these cereals that are almost devoid of all nutritional value and full of empty calories.
Top 10 most sugared kids cereals:
#10: General Mills Cinnamon Toast Crunch: 34 % sugar
#9: Frosted Rice Krispies: 39% sugar
#8: Kellogg’s Frosted Flakes: 39% sugar
#7: Reese’s Puffs: 40% sugar
#6: General Mills Apple Cinnamon Cheerios: 42% sugar
#5: Kellogg’s Apple Jacks: 42% sugar
#4: Trix: 43% sugar
#3: Kellogg’s Smorz Cereal: 43% sugar
#2: Kellogg’s Froot Loops: 45% sugar
#1: General Mills Cocoa Puffs: 47% sugar
For a healthy cereal alternative, try this homemade Apple Oat Cereal from weelicious.com!
Source: nutritiondata.com
Originally posted June 11, 2010
Written by Lea Barlow •
5 Comments
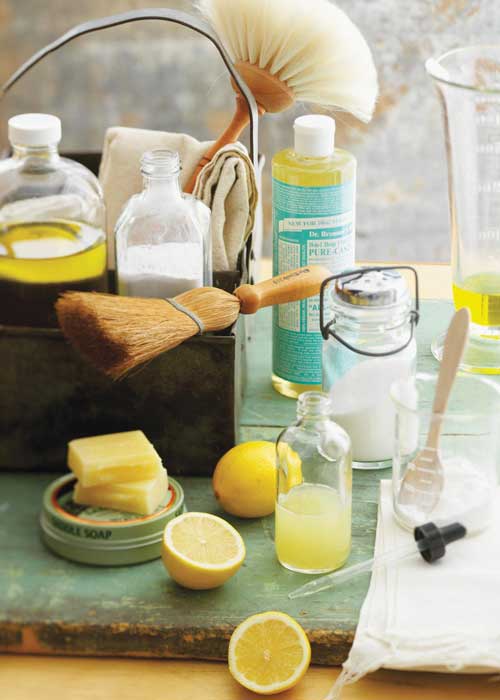
 Our local news all the time channel runs a weekly segment called Mrs. Fix-It. Basically, this wonder-woman shows you how to take stuff you already have to clean and repair things in your house. She has pretty much become my idol so I had to share some of her tricks. Today we will be focusing on the cleaning as the repairing is a bit advanced for me. You will not find me making homemade spackle anytime soon.
The best part of these cleaning ‘recipes’ is they are all made without toxic chemicals therefore eliminating your family’s exposure to harmful ingredients. This is a very important detail especially for those of you who have curious little ones running around. Here are the simple items you will need to clean green (I bet you already have most of them!):
- Baking Soda: scrubbing, whitening
- Beeswax: polishing wood
- Borax: removing stains, disinfecting
- Club Soda: lifting stains
- Cornstarch – absorbing stains
- Hydrogen peroxide: disinfecting, removing stains
- Lemon: removing stains and odors
- Liquid dish soap: sudsing power
- Olive Oil: polishing wood
- Pine Oil: cleaning soft wood floors
- Plant Essential Oils: chemical-free fragrance
- Salt: scrubbing
- Toothpaste: polishing metal
- White Vinegar: disinfecting, removing stains
Please remember that even all-natural cleaning ingredients can be irritating. Make sure you have plenty of ventilation and are wearing gloves while you clean.
1. All-Purpose Cleaner – Use on any non-wood surface
- 1/2 cup borax
- 1 gallon hot water
Mix until borax is dissolved; mop or spray and wipe surfaces
2. Floor and Wall Cleaner – Use this on any floor, including wood and on walls
- 1 cup white vinegar
- 1 gallon hot water
- 1 tablespoon to 1/4 cup liquid soap
- 1 to 2 tablespoons pine or lemon oil
Mix all ingredients and clean floor or walls with mop or damp rag. Follow with a clean-water mop.

3. Glass Cleaner - Shine on without toxic ammonia-based products
- 1/4 cup white vinegar or 1 tablespoon lemon juice
- 2 cups water
- 3 to 4 drops liquid soap
Mix and spray or wipe-on; for the best shine, use old newspapers.
4. Soft Scrub – Use this non-scratching, chlorine-free paste on enamel or porcelain
*You know those stains on the counter that make your heart race when you see them? This scrub will get them out. I use it all the time when my husband throws hot sauce all over the kitchen.*
- 1 cup baking soda or borax
- Warm water
- 2 to 3 drops liquid soap
Combine baking soda or borax with enough water to form a paste. Add liquid soap. Apply to surfaces, let sit at least 5 minutes, and scrub with a non-abrasive sponge. Rinse and wipe off residue.
5. Grout Cleaner – Kill mildew and whiten grout without chlorine
- Baking soda
- White vinegar or hydrogen peroxide
Combine ingredients to make a paste. Let stand 30 minutes or more, then scrub.
6. Toilet Bowl – Scrub with 1/2 cup of borax to brighten and disinfect. For daily maintenance, brush the bowl with baking soda and let sit for a while before flushing. Add white vinegar for a little extra stain-lifting fizz.
*Happy Cleaning!*
Source: naturalhomemagazine.com
Written by Lea Barlow •
2 Comments
 This is the year I am FINALLY going to bite the bullet and go for the wax. I swear. The idea of someone taking hot wax to my nether regions never appealed to me but what’s even less appealing is the fluctuation of my bikini area from 70′s style bush to all of those angry and irritated red bumps. At age 33 it’s time to get that area under control. Because it still freaks me out a bit I turned to The Body Bar Owner, Esthetician and expert Vajazzaler, Kara Mize, to walk me through the process. Here’s what she had to say…
I’m not gonna lie. Waxing your lady bits is not a pleasurable experience. It is however worth it. It is one of the best things since sliced bread. I am not a glutton for punishment, but I will take 20 to 30 minutes once a month to get my lady bits waxed. I will deal with the pain because I no longer have to shave, which totally sucks; and let’s be honest, my man loves it and it is so much more convenient to wax then it is to shave. I wax women’s cookies for a living and I’m good at it. I know what it feels like, and I give the same result to my clients that I would give to myself. The best. I know how scary it can be for first time waxers and the anxiety that comes along with every wax and I have some important tips to share with you when on the hunt for a place to get a good wax.
Tip #1
If you’ve never waxed your hoo-hoo before, the best thing to do is to ask your girlfriends where they go or if they know of anywhere good. If you’re too embarassed to ask, then start googling. The places that are good usually have great reviews. You do not want to go just anywhere for a bikini wax. That is not an area that you want just anyone seeing let alone waxing. Trust me…been there done that and I’ve had my share of bad experiences. If you have any questions at all about the waxing do not hesitate to ask the spa/salon you are calling to make your appointment. They should put your mind at ease!
Tip #2
One of the key factors for first time waxers is letting the hair grow. Many women think that 4 days of hairgrowth after shaving is so long. No way ma’am. The hair length has to be at least a 1/4 of an inch or 2-3 weeks of growth. The longer the better. If it’s too short, it can’t be waxed because there’s no way that the wax will grab the hair. Youideally want a nice smooth wax with minimal tweezing, that’s why the longer the hair the better. Makes for a nice, smooth, lasting wax and a great result.
Tip #3
To prepare for the day of your bikini wax, take some ibuprofen 30 minutes before your wax. I also offer to my clients a glass of red or white wine or sangria to help calm their nerves. A little bit of alcohol goes a long way when it comes to bikini waxing. I also offer a service called the “No Scream Cream” add-on. You can come in 30 minutes before your scheduled appointment, apply a topical anesthetic known as the “No Scream Cream”; Enjoy a glass of wine and catch up on the latest gossip in People Magazine for 30 minutes while the anesthetic takes effect. Some of my clients swear by this cream and refuse to wax without it.
Tip #4
Depending on what type of wax you desire, brazilian, completely bare, almost there brazilian (if you’re confused by the different wax services don’t hesitate to ask the spa to describe the difference between them) …the treatment should never last longer than 30 to 40 minutes, especially for your first time. It’s hard not to be embarassed to show a new person your lady bits but just keep in mind that they do the same service all day long and have seen it all!! They do not remember or talk about you, they are just there to do the best job possible for you! Keep in mind your very first wax will always be the worse. It’s more painful because the hair is so coarse from shaving BUT after waxing your hair it becomes softer, finer, and comes back less and less after each wax and makes for a less painful experience each time. I always try to talk my clients, especially new ones through the entire process. I let them know when I need them to take a deep breath for me and also when I’m waxing an area that will barely hurt at all. We talk about life, love, men, kids, relationships, the whole sha-bang. It’s one of the best parts of my day, getting to know a client and making her feel comfortable with me at the same time. A good waxer will do the same.
After you made it through, pat yourself on the back. You did it! You made it through your very first bikini wax. I promise, you will now be addicted and if you’re in a relationship, your guy or girl will love it. You will never shave again which is one of the biggest No-No’s of waxing. You wax once a month depending on your hair growth and never shave in between because it will be like starting all over again. Exfoliate the entire area 2-3 times a week with a salt or sugar scrub to keep the ingrown hairs away and you will be good to go! Happy Waxing!!
*Thanks, Kara!*
Written by Lea Barlow •
2 Comments
 It may seem obvious but just because a favorite treat now comes stamped with an organic seal of approval it does not give you license to shovel large quantities down your gullet. ORGANIC describes how foods are produced not how much sugar, fat or calories a food contains. While I am not so naive to think those Oreos are diet food I am guilty of filling my basket full of carb-laden ‘organic’ snacks at the Fresh Market. I have a particular proclivity towards organic blueberry granola. I once finished off half a bag in one sitting. But I digress.
Organic food is the latest victim of the ‘health halo’ effect. The ‘health halo’ is a phrase heath professionals have used for years to describe a food item labeled with persuasive terms that lead to additional caloric intake. A classic example is the low fat cookie in grocery stores that has the same amount of calories as its regular fat counterpart. Terms like low-fat, organic, or trans-fat-free, cast a wide halo around a food item and this tends to hide some of its less nutritious attributes.
My advice is and always will be to READ THE LABEL. Do not assume that because it says ‘gluten-free’ and ‘whole grain’ that you have free reign to go for seconds or thirds. Additionally, remember that ‘made with organic ingredients’ is not the same thing as 100% organic. Avoid items that contain ingredients you cannot pronounce and stay clear of high fructose corn syrup (the devil) and artificial sweeteners.
A 100% organic cookie is by all means a healthier choice if you are in the mood to treat yourself. But remember, it is still a cookie.
Written by Lea Barlow •
1 Comment
 Yes, cereal is a very easy go-to meal to serve on mornings when the kids are fighting, the dog’s barking and you’re running late. That’s pretty much every morning in my house. But there is not one box of cereal to be found. There is a reason for that: cereal makes you fat. Most breakfast cereals are very high on the glycemic index. The glycemic index, or GI is a measure of the effects of carbohydrates on blood sugar levels. For most people, sending an overwhelming surge of sugar into your system is the prescription for building excess body fat and sets you up for a major crash later. It takes 2 minutes to microwave an egg and turkey sausage. Add some fresh fruit and breakfast is served. Or I guess you could serve up any one of these cereals that are almost devoid of all nutritional value and full of empty calories.


