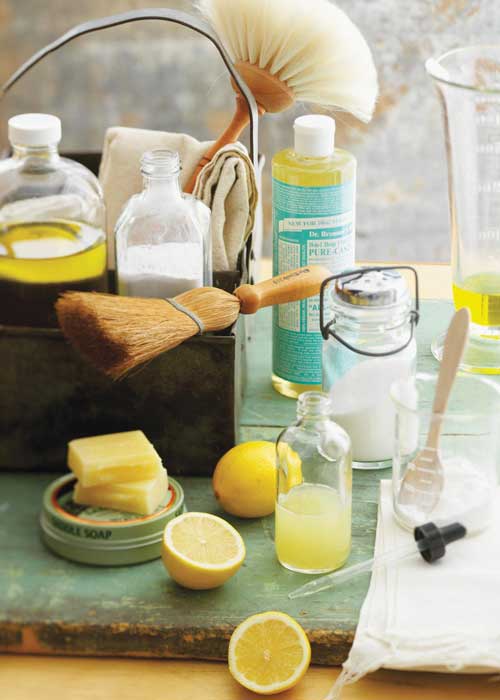
 Our local news all the time channel runs a weekly segment called Mrs. Fix-It. Basically, this wonder-woman shows you how to take stuff you already have to clean and repair things in your house. She has pretty much become my idol so I had to share some of her tricks. Today we will be focusing on the cleaning as the repairing is a bit advanced for me. You will not find me making homemade spackle anytime soon.
The best part of these cleaning ‘recipes’ is they are all made without toxic chemicals therefore eliminating your family’s exposure to harmful ingredients. This is a very important detail especially for those of you who have curious little ones running around. Here are the simple items you will need to clean green (I bet you already have most of them!):
- Baking Soda: scrubbing, whitening
- Beeswax: polishing wood
- Borax: removing stains, disinfecting
- Club Soda: lifting stains
- Cornstarch – absorbing stains
- Hydrogen peroxide: disinfecting, removing stains
- Lemon: removing stains and odors
- Liquid dish soap: sudsing power
- Olive Oil: polishing wood
- Pine Oil: cleaning soft wood floors
- Plant Essential Oils: chemical-free fragrance
- Salt: scrubbing
- Toothpaste: polishing metal
- White Vinegar: disinfecting, removing stains
Please remember that even all-natural cleaning ingredients can be irritating. Make sure you have plenty of ventilation and are wearing gloves while you clean.
1. All-Purpose Cleaner – Use on any non-wood surface
- 1/2 cup borax
- 1 gallon hot water
Mix until borax is dissolved; mop or spray and wipe surfaces
2. Floor and Wall Cleaner – Use this on any floor, including wood and on walls
- 1 cup white vinegar
- 1 gallon hot water
- 1 tablespoon to 1/4 cup liquid soap
- 1 to 2 tablespoons pine or lemon oil
Mix all ingredients and clean floor or walls with mop or damp rag. Follow with a clean-water mop.
3. Glass Cleaner - Shine on without toxic ammonia-based products
- 1/4 cup white vinegar or 1 tablespoon lemon juice
- 2 cups water
- 3 to 4 drops liquid soap
Mix and spray or wipe-on; for the best shine, use old newspapers.
4. Soft Scrub – Use this non-scratching, chlorine-free paste on enamel or porcelain
*You know those stains on the counter that make your heart race when you see them? This scrub will get them out. I use it all the time when my husband throws hot sauce all over the kitchen.*
- 1 cup baking soda or borax
- Warm water
- 2 to 3 drops liquid soap
Combine baking soda or borax with enough water to form a paste. Add liquid soap. Apply to surfaces, let sit at least 5 minutes, and scrub with a non-abrasive sponge. Rinse and wipe off residue.
5. Grout Cleaner – Kill mildew and whiten grout without chlorine
- Baking soda
- White vinegar or hydrogen peroxide
Combine ingredients to make a paste. Let stand 30 minutes or more, then scrub.
6. Toilet Bowl – Scrub with 1/2 cup of borax to brighten and disinfect. For daily maintenance, brush the bowl with baking soda and let sit for a while before flushing. Add white vinegar for a little extra stain-lifting fizz.
*Happy Cleaning!*
Source: naturalhomemagazine.com
Written by
Lea Barlow
•
2 Comments
 Name: Danielle Alger
Kids: Kane and Kara (7yr old boy/girl twins) & Luke (5 yrs old)
Occupation: Headshot Photographer
Hometown: Carlsbad, CA
H&H Interview with Danielle:
1. What are the top 3 items in your grocery cart?
On a good day: Humus, Fruit & Organic Chicken
On a “Hormonal” day: Red Wine, Dark Chocolate & Kettle Salt & Vinegar Chips (my favorite trifecta!)
2. What are you reading (honestly)?
The Bible (my ongoing read) & Suze Orman: The Laws of Money and Lessons of Life. I am the CEO of our household and I am determined to be a great example to our children on how to handle money. Sadly, most people graduate college without really knowing how to handle it (me!).
3. What is your guilty pleasure when you get a break from the kids?
Sitting in a quiet place with a cup of coffee (or a glass of wine, chocolate, & vinegar chips-see question #1) and a trashy gossip magazine!
4. What would we be surprised to find in your purse?
Coupons. I use them, really! My husband is laughing right now, he is convinced that I walk into stores and ask, “How can I possibly pay full retail for my purchases?”
5. What is your favorite reality TV show?
Sam the Cooking Guy. He is so funny-I love a funny man! He cooks quick, great meals and I love that he left his corporate job to pursue his passion and it worked!
6. What is your cocktail of choice?
Great Red Wine. I love to drink it in a beautiful glass, in a beautiful place with my favorite man (Shaun Alger).

7. What is the funniest thing your kids have ever said or done lately?
The other morning I woke up to my precocious 7 year old daughter, Kara, staring at me while I slept. She said, “Mom, you look way better with Make-up on!” (That’s funny and true!)
8. What is your favorite quotation?
There are many great quotes but one that is a bit of a mantra for me these days is: “Freedom lies in being bold” -Robert Frost
9. What is your most hated household chore?
Putting laundry away, it never ends! I would say scrubbing toilets but I delegated that job years ago.
10. Who is your favorite celebrity mom and why?
I just went to the “Women’s Conference 2010” in Long Beach and I was super impressed with Maria Shriver , the host of the event. She seems like such a dynamic woman who has managed to juggle her roles with such grace and transparency. She has a successful career, happy marriage, and well-adjusted children. Impressive and very rare for a Celebrity.
11. What is one thing most people don’t know about you?
I’m shy. When I am around people I am comfortable with I am gregarious, fun and funny. But put in a situation out of my comfort zone I struggle a bit. Being a businessperson myself and also being married to an entrepreneur I have had to overcome it. It really helped me to read books on networking and learning the art of small talk. (See #8 for Favorite Quote).

12. What is your secret for staying Hot & Healthy?
On most days I wake up by 5:15am and workout before the rest of the house is rockin’ and rollin’. I always try to push myself past my comfort zone. Last year I did P90X and my first Triathlon, this year I am doing P90X again and running a ½ Marathon. I center myself each day (ok not everyday!) by reading the Bible or meditating-quiet time is not easy to come by in this house!
I am committed to consistent improvement and growth. I am always doing some whacky new thing whether it’s a diet or exercise program or researching new ideas on parenting or business. I CANNOT resist a new “product”. I am going to be 40 this year so lately it’s been “anti-aging” skin regimes!
For me to stay truly healthy I do my best to balance all my roles and keep my priorities in order.
Written by
Lea Barlow
•
9 Comments
After the holidays I swore off any more entertaining. As usual though, time heals all wounds and I am in party mode once again. For this weekends festivities I will be experimenting with crostinis. Now while I love the classic bruschetta, I wanted to kick it up a notch and try a couple of these more unique recipes….
 Pesto Tomato Crostini
- 1 cup pesto
- 1 loaf French baguette
- ½ pound fresh mozzarella
- olive oil
- 4 medium tomatoes, sliced
- salt, to taste
- ground pepper, to taste
1. Set your oven to 375 degrees
2. Slice the bread into 1 ½” slices and arrange them on a baking pan
3. Spread a layer of fresh Pesto Sauce on each round of bread
4. Slice your mozzarella into rounds and place a slice of cheese on top of each slice of bread
5. Place a tomato slice on top of each piece of cheese
6. Slide the tray of baguette rounds in the oven until they lightly brown and the cheese melts (about 5 minutes)
7. Add salt and pepper to taste
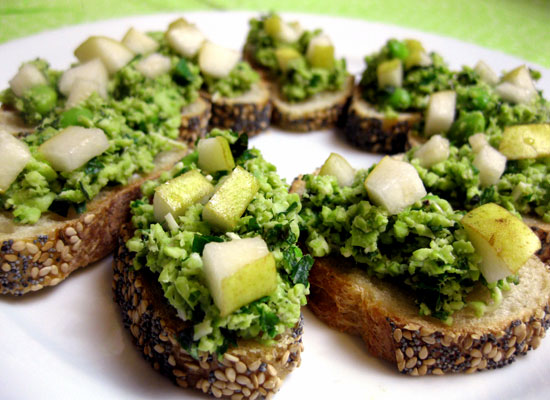 Edamame & Pear Crostini
- 16 ounce bag of frozen shelled edamame
- 4 tablespoons extra virgin olive oil
- 1 cup chopped mint
- 1/2 cup grated pecorino Romano cheese
- 1/2 teaspoon salt
- 1/4 teaspoon freshly ground pepper
- 1 baguette
- 1 Bartlett pear, diced
- Preheat oven to 350° F.
- Boil the edamame in salted water for 10 minutes.
- Remove beans with a slotted spoon and place in ice water for a couple minutes to cool; then drain. Set aside 1/4 cup of the whole edamame and place the remaining edamame a food processor; process until coarsely chopped.

Beluga Lentil Crostini – from 101 Cookbooks
1 lb. black beluga lentils
1 sweet baguette, sliced thinly into 1/6th-inch rounds
1/3 cup extra-virgin olive oil or melted clarified butter
1/2 t. fine-grain sea salt
8 ounces spreadable goat cheese
a small splash of milk
3-4 large cloves of garlic
2 big bunches of chives
Preheat oven to 350.
Cook the lentils: Wash and pick over the lintils Place the lentils in a large saucepan and cover with water using 2-3x the quantity of lentils.Bring to a boil and simmer for 15-20 minutes. Lentils should be tender but not splitting and falling apart. Salt to taste at this point – use somewhere between 2t. -1T. of salt for a pound of lentils. Remove from the heat and drain any remaining liquid. Let cool.
Make the garlic crostini: In a large bowl add the oil/butter and salt. Add all the sliced baguette rounds to the bowl and toss well. Place rounds in a single layer across two baking sheets. Place in the oven and bake for about 10 minutes or until slightly golden. Remove and let cool. Cut the ends off the garlic cloves. Take a single clove in your fingers and gingerly rub the top of each crostini with the garlic to give each slice a bit of a garlic kick. Don’t overdo it.
Make the chive goat cheese spread: In a small bowl add the goat cheese and a small splash of milk (just enough to thin the cheese and make it spreadable). With scissors, snip one bunch of chives into the goat cheese and stir to combine. Set aside.
For assembly all ingredients should be at room temperature. Take each crostini and give it a spread of the goat-chive spread. Top with a small spoonful of lentils. Garnish with more chopped chives (and pretty purple chive blossoms for the platter if you can find them).
- makes about 5 dozen
 Sweet Pepper Crostini
- 6 slices baguette (1/2-inch-thick)
- 2 tablespoons olive oil
- 1/2 to 3/4 cup roasted red bell pepper strips
- 1/3 to 1/2 cup grated smoked mozzarella or fontina
Preheat the oven to 375 degrees F.
Arrange the bread slices on a baking sheet. Brush the oil over the bread slices.
Bake until pale golden and crisp, about 15 minutes.
Arrange the bell pepper strips atop the bread. Sprinkle with the cheese.
Broil until the cheese melts, about 2 minutes.
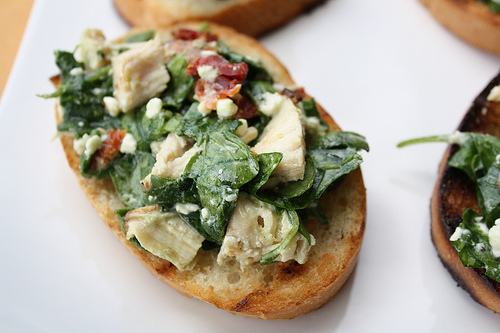
Chicken Crostini – from blogchef
2 boneless/skinless chicken breasts
1 ¼ cups Italian salad dressing (divided)
4 cups fresh spinach (torn)
1/3 cup crumbled feta cheese
8 sun dried tomatoes (packed without oil, chopped)
1 (16 ounce) loaf focaccia bread (or French bread, cut into ½” thick slices)
¼ cup olive oil
Step 1: Place chicken breasts and 1 cup of Italian salad dressing in a large bowl. Cover and refrigerate. Marinate for 3 hours. Heat a grill, and discard and left over dressing from the chicken marinade. Grill chicken 7 minutes per side or until the juices run clear and chicken is no longer pink inside. Allow to cool and shred or cut into small pieces.
Step 2: In a large bowl mix cooked chicken, spinach, sun dried tomatoes and feta cheese. Toss with remaining salad dressing until well coated.
Step 3: Brush each bread slice on both sides with olive oil. On the same grill used to cook the chicken, grill bread slices 1 minute per side or until lightly toasted. Place portions of the chicken mixture on each bread slice and serve.
*Happy Friday*
Written by
Lea Barlow
•
Leave a comment
 This is the year I am FINALLY going to bite the bullet and go for the wax. I swear. The idea of someone taking hot wax to my nether regions never appealed to me but what’s even less appealing is the fluctuation of my bikini area from 70′s style bush to all of those angry and irritated red bumps. At age 33 it’s time to get that area under control. Because it still freaks me out a bit I turned to The Body Bar Owner, Esthetician and expert Vajazzaler, Kara Mize, to walk me through the process. Here’s what she had to say…
I’m not gonna lie. Waxing your lady bits is not a pleasurable experience. It is however worth it. It is one of the best things since sliced bread. I am not a glutton for punishment, but I will take 20 to 30 minutes once a month to get my lady bits waxed. I will deal with the pain because I no longer have to shave, which totally sucks; and let’s be honest, my man loves it and it is so much more convenient to wax then it is to shave. I wax women’s cookies for a living and I’m good at it. I know what it feels like, and I give the same result to my clients that I would give to myself. The best. I know how scary it can be for first time waxers and the anxiety that comes along with every wax and I have some important tips to share with you when on the hunt for a place to get a good wax.
Tip #1
If you’ve never waxed your hoo-hoo before, the best thing to do is to ask your girlfriends where they go or if they know of anywhere good. If you’re too embarassed to ask, then start googling. The places that are good usually have great reviews. You do not want to go just anywhere for a bikini wax. That is not an area that you want just anyone seeing let alone waxing. Trust me…been there done that and I’ve had my share of bad experiences. If you have any questions at all about the waxing do not hesitate to ask the spa/salon you are calling to make your appointment. They should put your mind at ease!
Tip #2
One of the key factors for first time waxers is letting the hair grow. Many women think that 4 days of hairgrowth after shaving is so long. No way ma’am. The hair length has to be at least a 1/4 of an inch or 2-3 weeks of growth. The longer the better. If it’s too short, it can’t be waxed because there’s no way that the wax will grab the hair. Youideally want a nice smooth wax with minimal tweezing, that’s why the longer the hair the better. Makes for a nice, smooth, lasting wax and a great result.
Tip #3
To prepare for the day of your bikini wax, take some ibuprofen 30 minutes before your wax. I also offer to my clients a glass of red or white wine or sangria to help calm their nerves. A little bit of alcohol goes a long way when it comes to bikini waxing. I also offer a service called the “No Scream Cream” add-on. You can come in 30 minutes before your scheduled appointment, apply a topical anesthetic known as the “No Scream Cream”; Enjoy a glass of wine and catch up on the latest gossip in People Magazine for 30 minutes while the anesthetic takes effect. Some of my clients swear by this cream and refuse to wax without it.
Tip #4
Depending on what type of wax you desire, brazilian, completely bare, almost there brazilian (if you’re confused by the different wax services don’t hesitate to ask the spa to describe the difference between them) …the treatment should never last longer than 30 to 40 minutes, especially for your first time. It’s hard not to be embarassed to show a new person your lady bits but just keep in mind that they do the same service all day long and have seen it all!! They do not remember or talk about you, they are just there to do the best job possible for you! Keep in mind your very first wax will always be the worse. It’s more painful because the hair is so coarse from shaving BUT after waxing your hair it becomes softer, finer, and comes back less and less after each wax and makes for a less painful experience each time. I always try to talk my clients, especially new ones through the entire process. I let them know when I need them to take a deep breath for me and also when I’m waxing an area that will barely hurt at all. We talk about life, love, men, kids, relationships, the whole sha-bang. It’s one of the best parts of my day, getting to know a client and making her feel comfortable with me at the same time. A good waxer will do the same.
After you made it through, pat yourself on the back. You did it! You made it through your very first bikini wax. I promise, you will now be addicted and if you’re in a relationship, your guy or girl will love it. You will never shave again which is one of the biggest No-No’s of waxing. You wax once a month depending on your hair growth and never shave in between because it will be like starting all over again. Exfoliate the entire area 2-3 times a week with a salt or sugar scrub to keep the ingrown hairs away and you will be good to go! Happy Waxing!!
*Thanks, Kara!*
Written by
Lea Barlow
•
2 Comments
 Our local news all the time channel runs a weekly segment called Mrs. Fix-It. Basically, this wonder-woman shows you how to take stuff you already have to clean and repair things in your house. She has pretty much become my idol so I had to share some of her tricks. Today we will be focusing on the cleaning as the repairing is a bit advanced for me. You will not find me making homemade spackle anytime soon.


